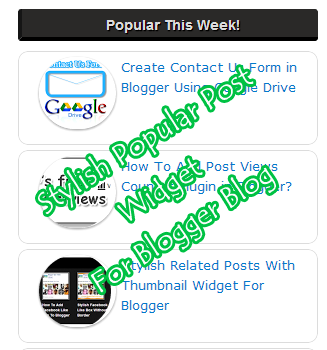
Popular posts widget in blogger is the best widget which helps to
represent the whole blog in a better way to the visitors. It shows the most popular posts
of a blog to the readers so that they can also read them. This amazing
gadget in blogger sidebar helps to highlight the trending posts in
front of readers. Except these benefits, there is also a limitation of
this widget. The only limitation is that the default popular posts
gadget is not so attractive and attention grabbing because of its
designing and dull looks. But don't worry, we can override
its stylesheet and change its colors and fonts according to our need so
that it matches best with our blog template. In today's tutorial I will
tell you the way to make this gadget more prominent and stylish so that
it grabs your visitor's attention. We will customize the default gadget
to transform it into a masterpiece. So, let start the tutorial.
Add Popular Posts Widget To Blogger Blog
First we need to add default popular posts widget into our blog. Perform the following simple steps to add it.
- Go to Blogger > Layout.
- Click on Add a gadget link and choose popular posts gadget from the gadgets list.
- Now make following settings
- Set most viewed to Last 7 days
- Check image thumbnail and snippet to show thumbnail along with post summary. It will make our gadget spicier.
- Select no. of posts you want to show. In this example I am selecting 5. You can show at most 10 posts.
- Save the widget.
- Now go to Blogger > Template
- Backup your template to prevent it from any crash.
- Edit HTML > Proceed
- Search ]]></b:skin>
- Now replace it with the following code:
- Save your template.
- Done!
/*--- BloggerTipsTricks --- */
.popular-posts ul{padding-left:0px;}
.popular-posts ul li {background: #FFF url(https://blogger.googleusercontent.com/img/b/R29vZ2xl/AVvXsEhGULPJqF1DN0z-Wz7K2n9YqmEKqoTkHJ4tOHjdxyahY6laJja4T2kkhUXcV8gMz9IJvVk2mlniEqRGlse1Mgkld9u0DO8m_QQoiPomR-38eSmOSLIQeHqAEEDUqPyzJRquBk20zBSAJfU/s1600/1.gif) no-repeat scroll 5px 10px;
list-style-type: none;
margin:0 0 5px 0px;
padding:5px 5px 5px 20px !important;
border: 1px solid #ddd;
border-radius:10px;
-moz-border-radius:10px;
-webkit-border-radius:10px;
}
.popular-posts ul
li:hover {
border:1px solid #6BB5FF;
}
.popular-posts ul
li a:hover {
text-decoration:none;
}
.popular-posts .item-thumbnail img {
webkit-border-radius: 100px;
-moz-border-radius: 100px;
border-radius: 100px;
-webkit-box-shadow: 0 1px 3px rgba(0, 0, 0, .4);
-moz-box-shadow: 0 1px 3px rgba(0, 0, 0, .4);
box-shadow: 0 1px 3px rgba(0, 0, 0, .4);
}
]]></b:skin>


3 comments
I am not sure where you are getting your info, but good topic.I needs to spend some time learning more or understanding more.Thanks for great info I was looking for this info for my mission.
Replywebsite design
wow thanks alot my friend it works for me
Replythanks sir ye to samaj agaya, please ap mjhe ye bata sakty hain kay blogger main posts pe thumbnails ko kesy round shape karian gay. main apny blog ka link dy raha hon ap please mjhe ye tariqa bata dain, thanks.
Replyhttp://link4video.blogspot.com/
Post a Comment